Accuracy versus reproducibility
Our flow measurement library:
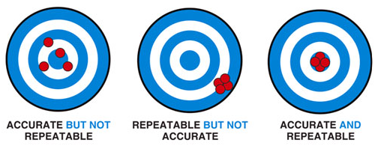
The difference between accuracy and reproducibility is quickly apparent using an everyday example: in a car, an odometer indicates speed. The speedometer indicates 135 km/h when driving 120 km/h. Every time. That is very reproducible, but not really accurate.
If you know what the accuracy is, the deviation may not be so important anymore. In this example the measured speed is always 15 km/h too low and that can then be taken into account. For control functions in gas and liquid systems, a flow meter may have a hefty deviation in some applications. As long as that deviation is always the same, it can be compensated for. So accuracy and reproducibility go hand in hand and cannot be seen separately.
An accuracy without making a statement about the reproducibility (or repeatability) is not useful. Often both values are stated as follows:
Accuracy: 10% +/-1%
The accuracy is then 10% and the because the measurement result is not always reproducible, this gives an additional error of 1% more or less. The measured value can in this case have a deviation of 9% to 11% from reality.

Accuracy and reproducibility are especially important when a flow measurement is used for the settlement of delivered products. Both the supplying and the receiving party benefit from an accurate measurement. Therefore, settlement measurements (also called custody transfer measurements) are subject to strict requirements. The Dutch Metrology Act used to apply. Now the Metrology Act applies and the MID (Measuring Instrument Directive) is the directive for this type of flow measurement in the European Union.
Percentage of full scale or measured value
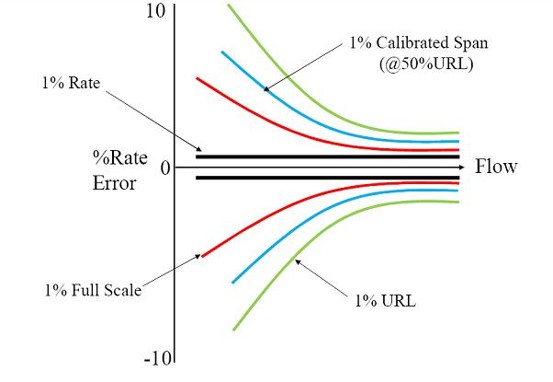
For both accuracy and reproducibility, the specification may be expressed as a percentage of the measured value (Measured Value, % MW or % MV) or as a percentage of the full value (Full Scale, % FS). The specified specificity must be critically evaluated. For both accuracy and reproducibility, the specification may be given as a percentage of Measured Value (% MW or % MV) or as a percentage of Full Scale (% FS). One should critically evaluate the specification given. A flowmeter with an accuracy specification of 2% MV will give a value in the lower range that is much closer to the truth than one with 1% FS.
Differential pressure measurement accuracy
For differential pressure flow measurements this is certainly relevant. A (differential) pressure transmitter with a specified turndown of 100:1 and a specification of 0.1 % FS seems to be very good, but has in the lower range, towards the 1 % of full scale a measuring error of 10 % of the measured value. This is the main reason that often "stacked" transmitters are used. Two or more dP transmitters are used, one in the low dP range, the other in the high range. A flow computer determines which transmitter is active.

Linear deviation or calibration
The deviation that is introduced in the measurement is almost always expressed in a percentage. In that case the deviation is linear: the same over the entire range. Therefore you can compensate for it in the flow computer with a calculation factor. If the deviation is not the same over The deviation that is introduced in the measurement is almost always expressed in a percentage. In that case the deviation is linear: the same over the entire range. If the deviation is not the same over the range of the flow meter, it is often necessary to calibrate it. By taking a number of measuring points and comparing them to a standard, the deviation is determined. Compensating for this is done in the flow computer. the range of the flow meter, it is often necessary to calibrate it. By taking a number of measurement points and comparing them to a standard, the deviation is determined. Compensating for this is done in the flow computer.
Any Questions?
More information about our products, services or looking for a custom solution?
Please contact our Sales Engineers.

WE MAKE YOUR TECHNOLOGY WORK
NL - Tel. +31 70 413 07 50
USA - Tel. +(1) 973 383 0691
CN - Tel. +86 (10) 56865822/56865835
TW - Tel. +886-(0)3-5600560